Showing posts with label workshop. Show all posts

Saturday, 27 March 2021

More "Collage up your Journal" pages

 A couple more pages from my collage journal.

I liked the colour of this magazine image of a bowl and tied it in
with a background of some of my painted papers


A couple of sliced up/re-arranged lino prints on book pages


Wednesday, 22 January 2020

Moleskine toys

To save my blog from going "rusty", a couple of sketches from a past evening workshop devoted to toys, both completed in a Moleskine watercolour sketchbook.

Water soluble pen and watercolour

Water soluble pen and watercolour bear over a mixed media collage

Saturday, 31 August 2019

Three colour landscapes

Several years ago, my local art group set the evening's two hour workshop members the task of producing a landscape with just three colours.

Instead of going for just one image, I decided to try the idea out on a very small scale (about 3.5" x 2.5") and produced four experimental paintings.  The subjects were imaginary and were only intended as exploratory colour sketches - an interesting exercise.  I am not sure if I used the same three colours for all the sketches (I can only find one original in my old files, but my notes indicate that I used Rose Madder Genuine, Cobalt Orange and Cobalt Blue on Saunders cold pressed 300lb watercolour paper - the first image shown below).


Tuesday, 18 June 2019

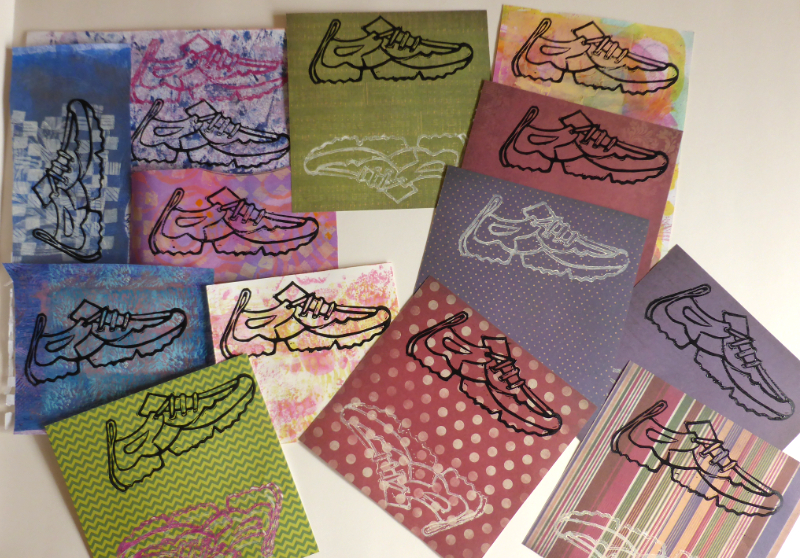
Boots and shoes

The subject of yesterday's art society's two hour evening workshop was "boots and shoes" in any medium.  I must admit it was not a subject I found particularly appealing so I tried to think of a more challenging way of approaching it, other than just producing a drawing or painting.

During the afternoon I made a lino-cut of a trainer, this was then printed onto various patterned and hand-painted papers to be cut up and collaged in varying combinations during the evening session.  The white prints were made with gesso, but were not showing up well on some of the papers so I decided to do some in black.  I was going to use black gesso, but picked up water soluble block printing colour by mistake and, despite a session with the hairdryer, these were not fully dry by the evening.  However, with care and a supply of baby wipes to hand, I managed to produce a reasonable image without smudging too much black ink everywhere.


The lino-cut is approx. 5" long


Tuesday, 11 June 2019

Lino printing workshop

Early on in my efforts with relief printing, I attended a local course on the three colour lino print process.  My initial attempt wasn't very good and my clown ended up looking rather sinister, but rather than waste time cutting a new block I concentrated on getting to grips with the different cutting and inking stages, as well as exploring the varying ways the same print could be used.

My prints weren't good enough to be used for anything other than reference so I decided to write up some notes from the weekend and chose 18 slightly differing images, all bound into a Japanese style album. It has become a handy little reference book - I am sure I would have forgotten most of it otherwise.

This has been added to the Bookbinding page, where you can see other examples of my artists' books.


A selection of some of the prints


I cut out and removed the clown and balloons from the brown
paper and glued the background over the print on the painted mulberry paper*.
 (Unfortunately, this was not a good print, but I liked the
effect of using the two different papers in one image.)
The clown cut from the brown paper (above) was collaged onto
 this print on cream paper


Thursday, 30 May 2019

Lino printing

Last week our art group arranged and provided equipment for an introductory workshop on lino printing.  Members who had attended an earlier full day session with a printmaking tutor were on hand to help those unfamiliar with the process, as well as bringing along examples of their own work.

Several participants had either limited experience, or none at all, of the lino printing process and, despite the short time available (only 2 hours), were able to produce some satisfying results and went away encouraged to experiment further.


Members' work (photos courtesy of P. Kitching)

The supplies used were: Essdee Softcut blocks and lino cut tools, Fabriano Unica printing paper (plus old book pages and coloured paper), and Calico Safe Wash Relief Ink*.  Inking plates, registration boards, rollers and barren were loaned by members.

* A tip I have since learned about cleaning up the ink is to apply the liquid soap before adding water.

As I was organising the supplies and overseeing the printing stations, I didn't have time to complete my block on the evening, but finished it later at home.


Sunday, 7 April 2019

Lino printing workshop

Yesterday I attended a lino printing workshop.  Karen Carter an experienced artist, illustrator, printmaker and tutor treated us to a well-organised and informative day's experience.  Some of those present had never used lino before and were a little daunted to begin with, but soon got to grips with the process, resulting in some really nice work.


In addition to single colour printing, Karen explained how the process could be expanded with the use of coloured backgrounds, ink blending, spot colouring, jigsaw printing, collaging, etc., showing us examples of these techniques in her own work.  There wasn't time for us to fully explore these additional techniques, but we are hoping to arrange a follow-up session in the not too distant future. A really inspiring day, thoroughly enjoyed by us all.


I knew we would be working on a piece of lino 6" x 8" and had pre-prepared a reasonably complicated floral design to utilise that size.  However, on the day, I realised that might be a little ambitious for the time available, so opted for a simpler design at half that size.My prints were definitely not all perfect, but I wanted to try out various different papers (book pages, mulberry paper, painted tissue paper, etc.) as well as the spot inking.  I had not used proper oil based printing inks before and I was interested to try these out (these were Caligo Safe Wash Inks).  I have used water-based printing ink in the past, but this did not suit my practice as I often like to add watercolour or fluid acrylic to enhance my finished prints and this ink would be reactivated once liquid paint was applied.  My solution to this problem has been to use gesso, black or white, adding liquid acrylic to the white if needed - this doesn't allow for an extended printing time, but so far my projects have been quite small.


Easy-Cut lino - cuts almost like butter! (size approx. 3.5" x 5")

Painted and gesso printed tissue (left), packing tissue (middle),
gesso printed tissue background with spot-colour over-printed

Spot-colour printed on mulberry paper (left); black print on book page (right)

Some of the prints produced by the rest of the group:


The following are some examples of Karen's work:


Some very small prints making up an interesting accordion booklet.
(Copyright Karen Carter)

A puzzle block - the initial block has been cut into
three separate pieces, inked with different colours,
reassembled and printed as one image
(Copyright Karen Carter)

The same block - one printed white on black (left),
the other printed black on white (right)
(Copyright Karen Carter)


(Copyright Karen Carter)


An effective use of one small block printed onto various different papers
(Copyright Karen Carter)


Tuesday, 19 March 2019

Chinese brush painting

At our Art Society meeting last night, we had a demonstration by Maggie Cross, who has been painting, tutoring and demonstrating Chinese brush painting for a number of years.  She has also written three books about the subject. Her art encompasses both meticulous and freestyle disciplines and on this occasion she used the latter style, at the same time explaining the various traditions, materials and symbols surrounding both the calligraphy and painting.  A very interesting evening.

After initially demonstrating the various brush strokes, she painted three studies (as shown below):

Wisteria (copyright Maggie Cross)

Rooster and family (copyright Maggie Cross)

Cat and Mouse (copyright Maggie Cross)
Several members bought brushes, paints etc. and at our next monthly meeting we are going to attempt  to put into practice what we have learned from this demo.

Thursday, 20 September 2018

Art society workshop

This month's Monday evening workshop challenge was to work from an uninspiring, black and white reference image supplied at the start of the session.  Members could interpret the subject either realistically, abstractly, as a whole or just in part, with the aim of producing something more interesting.

There were a couple of really imaginative abstract pieces which I admired, but I opted to try out a sketchy image on black paper.  I used a white gel pen to pick out the features I wanted to include, adding oil pastel and gouache to inject some colour.

This was our reference image

I used the Hahnemuhle Black Book -
 really nice, sturdy 250 gsm pages, ring-bound 9" x 9" 

Friday, 20 July 2018

Clothed model sketches

We were lucky enough to have some family members volunteer for this Monday evening's art group sketching session.  These were quick, timed poses (10 or 15 minutes) and it proved to be a very enjoyable and productive evening.

I opted to work small in an A5 sketchpad, with just graphite pencil.


Tuesday, 16 May 2017

Print workshop

At our local art group meeting last night, six of us set up tables around the hall with materials and examples of our individual printing techniques, with colleagues able to browse, watch mini demonstrations and ask questions.  We had lino printing, gelli printing for collage, Japanese woodblock, pastel painting with handcut stencils, inkjet and laser print transfers. It was a very successful and interesting evening, but unfortunately I was so busy with my display, in addition to trying to get a quick glimpse of what everyone else was doing, I completely forgot to take photos for our website write up.  I am hoping those participating will send me some notes and photos so I can rectify the matter. (Additional notes and images have been added here.)

My set-up included lino and Softcut, as well as handmade foam stamps, paste grain papers, printed tissue, mulberry and drawing paper which I use for cards, artists books and collage.

Sample papers, printing blocks and tools
Booklets and cards using handmade printed papers

Wednesday, 7 December 2016

Bookbinding workshop

Last week I attended a bookbinding workshop tutored by Josie Brown.  Josie is a calligrapher and she also makes delightful artist's books.

The structure we were making was a Japanese butterfly bound book, this involved sewing the sections with four needles - supposed to be really simple, but it was also quite easy to get in a tangle until you got the hang of it!  We used various weights of drawing and watercolour paper, with the binding allowing the book to open quite flat - ideal for use as a sketchbook. The cover was an uncomplicated folded wrapper into which the end papers of the book were slotted.

The sewn book block to which I added painted end papers

The folded cover
The end papers in place

I decorated the cover with a thin strip of salvaged end paper

Josie also showed us how to make a slipcase.  We didn't have enough time to make this on the day, but came away with an instruction sheet for later use.


Tuesday, 18 October 2016

Abstract

The challenge at our monthly art workshop yesterday was to make an abstract composition.  Quite a few of us were unfamiliar with this concept, but we were given a brief explanation and shown some examples of other artists' work to get us started.  It certainly made a change from our usual subject matter and, judging from the quiet concentration for a couple of hours, we all entered into the spirit of exploration.

My effort was on black paper, using Caran d'Ache Neo-pastels, gouache and some coloured pencil.  I quite liked the effect of the gouache over the waxy pastels - another technique which could come in useful in mixed media paintings.

11" x 16"