Showing posts with label stitch. Show all posts

Thursday, 22 July 2021

Marlborough Open Studios

Despite the forecast high temperatures last Sunday, a friend and I decided to make an early start to visit some of the open art studios around Marlborough.  Quite a few of those participating were in small villages or well hidden farms in the surrounding downs, but we managed to fit in a couple of venues where 3 or 4 artists were exhibiting together as well as some individual studios.

Of particular interest was the garden print studio of one of our art society colleagues, and another artist using fabric, stitch and mixed media.  I am not one to make impulse buys, but I did treat myself to a framed work from the latter.  The beauty of this piece is in the subtle colours and textural detail which is difficult to see in my photograph.

"Fields of Gold" 10" x 10"
by Ann Louise Smith


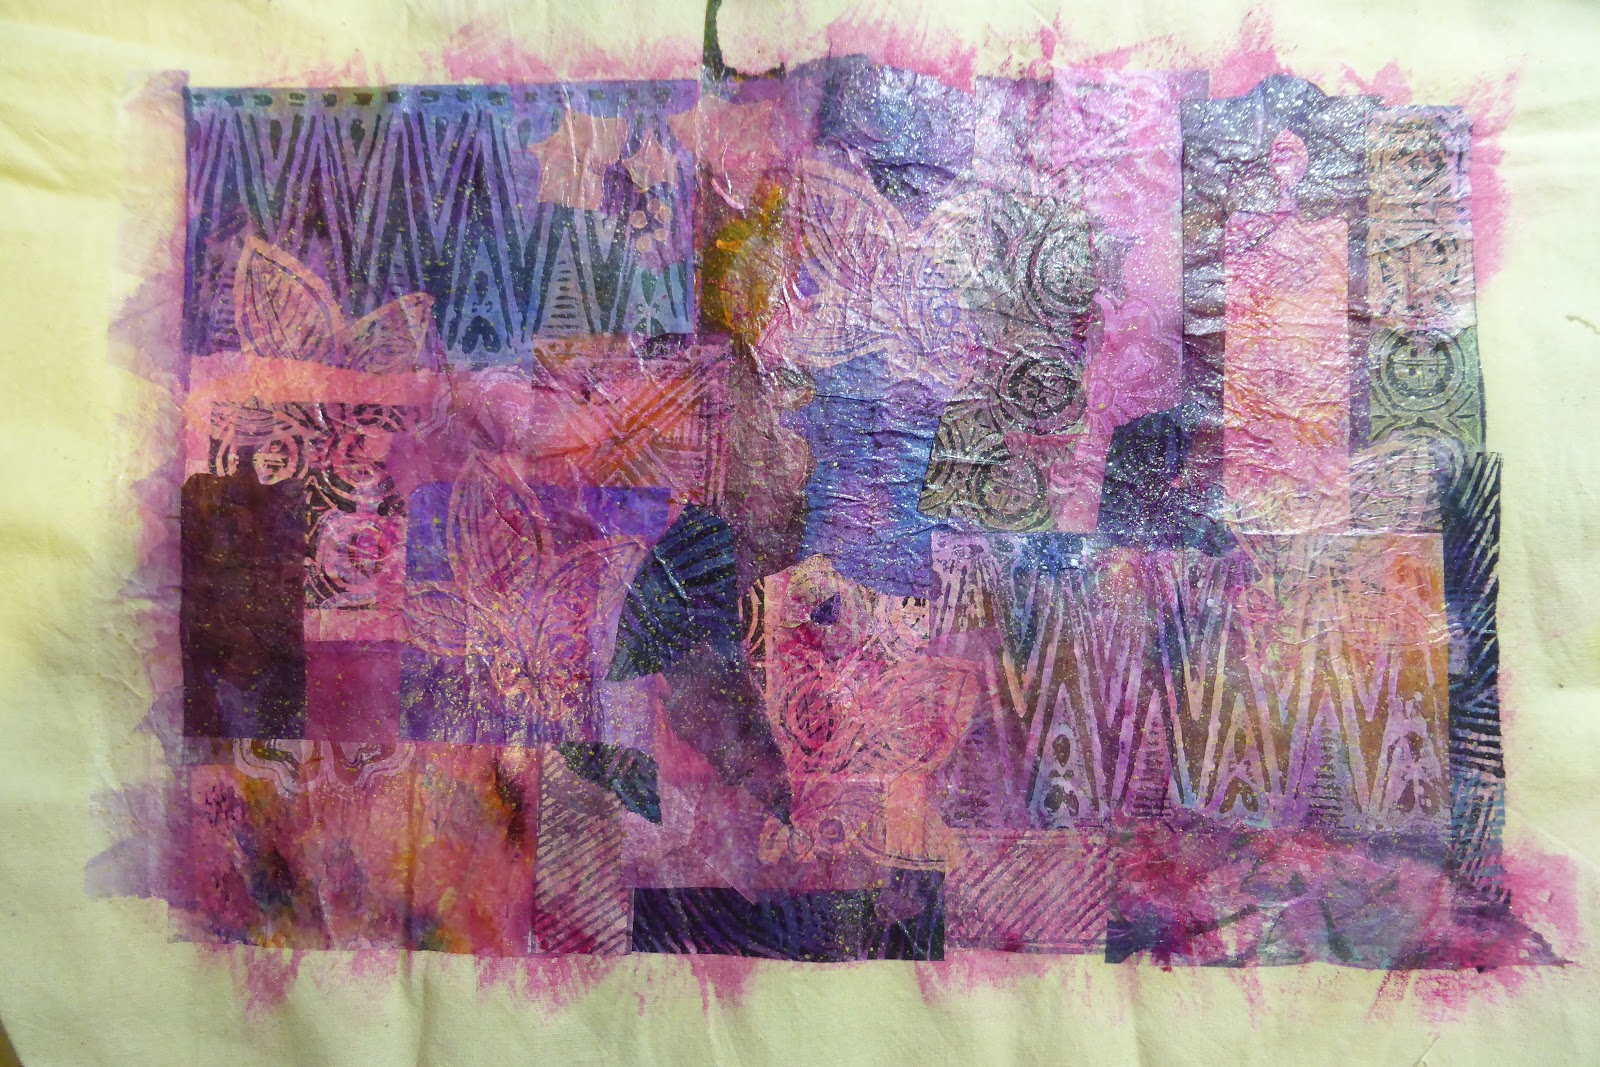
I was tempted to try out some of Ann's techniques on some scraps of calico (and used/washed antiseptic wipes).

Calico, fluid acrylic, metallic ink, collaged painted tissue
and wipes, hand embroidery, machine stitch and pen.
Painted wipe strips made up the plaited piece.


Friday, 9 July 2021

Another quirky postcard collage

I have started to over-think these postcard collages instead of quickly just grabbing what comes to hand - not necessarily a good idea.  

Handprinted tissue, mulberry and cartridge paper,
acrylic, gel pens and machine stitch
 (Hahnemeuhle watercolour postcard 6" x 4")


Friday, 25 June 2021

Postcard collage

 Another collaged postcard - 

Lino printed tissue, paste paper, texture paste, sketch
and machine stitch (6" x 4" on Hahnemuehle postcard

I am enjoying making use some of my facial sketches in these small collages.

Monday, 14 June 2021

Postcard collage

 Another small collage using one of my Hahnemuehle postcards.


Printed and painted tissue, book page, scanned sketch,
gold gel pen, machine stitch (6" x 4")


Tuesday, 27 April 2021

The completed Collage Journal


To recap, this journal was started in response to a 5 day challenge by collage artist Lydia Rink.  A set of 5 instruction videos plus a materials list were provided, starting with how to make a simple A5 journal, and making your own collage papers, plus sourcing images and letter forms from magazines, posters, etc.

I have used some pre-printed images and text, but mainly utilised my own painted and hand-printed papers together with snippets from my sketchbooks.  It took me a couple of pages to get into a way of working that suited me, but I enjoyed the process.


Friday, 12 March 2021

Collage journal continued

 Another couple of collage pages completed.


Paste paper, printed papers and a scanned sketch


The printed and stitched tissue paper background was done
a while ago, I just added the lettering shapes and 
the lino printed face


Tuesday, 19 January 2021

Updated Sketchbook Challenge spread

I've finally got round to adding a little more detail to the sketchbook pages I shared at the end of December.

On the left I have used some wine cork stamps and on the righthand page I stencilled paint through a fine paper-cut image from an old birthday card.  The latter didn't work particularly well, but there was enough information to bring out some detail with coloured pencil.


Friday, 13 November 2020

Sketchbook and online courses

I have been slow in adding work to my blog this month.  This has been partly because I have been taking a bit of a break after completing the daily Inktober challenge; in addition, I have been working on this year's Christmas card design which is not ready to be revealed yet.

I have also signed up for a short, online sketchbook challenge run by Laura Kemshall - eight videos throughout November (which can be followed at your own pace).  The course is very reasonably priced at £12 - if you are interested, follow this link.

I thought this would be an ideal opportunity to use the beautiful sketchbook my friend Pat made.  The first assignment was to "break the ice" and get rid of some of the blank pages by randomly adding some found papers, etc. - a couple of mine are shown below.  Now to catch up with the second session.

Faux leather cover with embroidered insert - 9" x 6.5"
(handmade by Pat Kitching)

Foam printed paper collage and stitch


Tartan ribbon - machine stitched

Paste paper collage and stitch

Part of a lino print

Another course being released later this month is by Este MacLeod - this will be free, but you need to sign up to her Newsletter (at the bottom on her home page) to receive details.

Happy sketching!

Tuesday, 1 September 2020

Drawing Attention and more sewing


 This is the September issue of the Urban Sketchers e-zine.

A few more pieces of my lockdown sewing samples. Three of these used the Inktense pencil rubbings that I mentioned in a previous blog.  The feather is a design I have used before, but I wanted to enlarge it and use the calico base this time.

Wednesday, 12 August 2020

Transferring lino images to fabric

Needing some more designs for my small embroidery samples, I tried out rubbings of lino cuts using Inktense pencils on my tea stained calico.

On the left, I "set" the Inktense using a brush and water.

In the middle, I wrapped some of the fabric behind the lino to minimise movement as I did the rubbing.  It was then sprayed lightly with water to set the colour.

The one on the right I have left dry.

I did attempt to keep the pencil rubbing as close to the edge of the images as possible, but there has been some staining of the surrounding fabric.

Monday, 22 June 2020

Needle and thread

My sketchbook seems to have given way to needle and thread over these last few weeks.  When tidying up my studio I found a piece of embroidery I started quite a few years ago, so it seemed a good time to make the effort to finish it (see this post). Since then I have tried to neaten up some basic stitches as well as trying new ones and in the process have ended up with several small samples.  Not sure what I am going to do with them,  maybe the basis for a fabric book?  We'll see - in the meantime, I am enjoying spending the odd hour exploring the world of stitch.


Each sample is only about 2" square
Each sample is about 2" square

In some instances I have drawn out my design with Inktense pencils, but I have also used felt-tip fabric pens and one started off as a lino print on fabric.

Tuesday, 5 May 2020

More stitching

Embroidery - something I haven't really done in ages, but on my grand tidy-up I found this small piece with only the large central flower started.  Some 20 years ago I had booked myself on a day course which involved using fabric paints to transfer our own design onto our material, using that as a guide for subsequent stitching.  I had imagined the course was going to be more about the painting so I lost interest and put the work aside.  However, with lock down time on my hands I decided to pick it up again and found it quite therapeutic to spend the occasional hour with needle and thread trying to recall the various embroidery stitches I once used.

Now it's finished, I am not sure what I am going to do with it, but it has renewed my interest and there is certainly a vast range of unusual and inspiring work being done by textile artists today.
This site has a wealth of information on the subject.

Approximately 6" square

Friday, 1 May 2020

More stitched leaves

I have spent a day and a half attempting to tidy and reorganise my art room - although there's still way too much clutter and "stuff" I have saved which "might come in handy one day"!  I've found bits I'd forgotten I had and re-read cards and letters too special to throw away.

I have not finished the spring clean yet but I did snatch a few minutes to try out some more stitched leaves.  This time I used old book pages, the machining was done first, then I washed over them with acrylic ink; as I wasn't keen on the slightly plastic appearance of my first attempt, I added the Modge Podge to the reverse this time, making sure I covered the stitching as well.  I brushed a little water outside the stitching lines which made the tearing easier.


Tuesday, 28 April 2020

Stitch and collage

Far too many hours spent on the internet, but I did find this little snippet which I thought was interesting and had to give it a quick try.  It was from Linda Vincent's blog - she made randomly painted paper, using her sewing machine to "draw" simple motifs which she then tore out and collaged onto her creations.

My machine is quite basic and doesn't have a "free sewing" facility, so it was a bit fiddly to achieve the shapes, but I think the wonkiness is part of its charm.  I cut round some of my shapes as it is easy to tear away the stitching if you are not careful.


Tuesday, 16 July 2019

Paper Fabric

At the beginning of this year I finally got round to experimenting with some paper fabric.  You can find some useful instructional videos on Youtube by searching for "paper fabric".

My base material was calico (unbleached cotton), over which I collaged various oddments of my hand-printed tissue paper.  I used Golden soft gel medium, making sure the fabric was liberally coated, then applying and overlapping sections of the tissue, brushing over all again with the gel to ensure good adhesion.  I had chosen tissue in the pink/blue/purple range, but unified the surface further with fluid acrylic glazes of magenta and blue.


I had no particular plans for this piece, but have recently acquired an iPad Mini and the fancy magnetic cover/stand that I purchased for it only protects the screen, so the idea of a custom-made case came to mind.

My paper fabric was not quite large enough, but fortunately I had left a fair margin of the base material to enable me to add more strips of tissue. Further glazes, printing and random machine stitching were applied and a lining made from some discarded navy t-shirt material.  The material was easy to work with and machine stitching no problem - perfect.....  except my measurements were not and the case was just a mere fraction too small!!  Not to be beaten at this late stage, I prepared another strip of fabric paper and added this on, so it has ended up a bit of a "mish mash", however, it will serve its purpose until my next attempt.

The paper button is made from 3 layers of watercolour paper, covered with tissue
Final size 9" x 5.75"
I am not sure how long this will last,  Although the fabric paper folds very easily, I notice there are some signs of cracking  along one edge - next time it might be worth using some plain fabric bias binding to protect the edges.